Snowflake Cost Optimization: Top 17 Techniques in 2025

What Is Snowflake Cost Optimization?
Snowflake is a popular cloud-based data warehouse service. Snowflake cost optimization is the process of identifying and implementing strategies to reduce expenses while using the Snowflake data platform. Snowflake costs can accumulate from compute resources, storage, and data transfer. Optimizing costs ensures the platform is used efficiently, without sacrificing performance or functionality.
Learn how to optimize snowflake warehouse in 2026, automatically.
Cost optimization on Snowflake involves analyzing usage patterns, evaluating inefficiencies, and applying best practices. With Snowflake’s consumption-based pricing model, users must create cost-effective query designs and limit unnecessary data processing. By understanding and addressing cost drivers, users can maximize value without exceeding budgets.
This is part of a series of articles about Snowflake pricing
In this article, we’ll cover the following Snowflake cost optimization techniques:
- Optimizing Compute Resources
- Efficient Storage Management
- Query Performance Tuning
- Monitoring and Managing User Activity
- Implementing Data Compression and Partitioning
- Query Acceleration
Key Factors Driving Snowflake Costs
Before diving into cost optimization techniques, it’s important to understand the main cost drivers when using Snowflake.
Compute Costs: Virtual Warehouses
Snowflake Gen1
Snowflake Gen1 standard warehouses charge based on a fixed credit rate tied to warehouse size. Billing is calculated per second, with a 60-second minimum whenever a warehouse starts. Credits scale exponentially with size—for example, a Medium warehouse uses 4 credits per hour, a Large uses 8, and so on up to 512 credits per hour for a 6X-Large.
For example, running an X-Small warehouse for exactly 10 minutes costs approximately 0.167 credits, while a 5X-Large for the same duration costs over 42 credits. Snowflake’s per-second billing helps minimize idle time costs, and auto-suspend/resume features further help reduce unnecessary usage.
Using multi-cluster warehouses, which are available in Enterprise Edition, adds another layer of scalability. Billing then depends on both the size of the warehouse and the number of concurrently active clusters. For example, a 3X-Large warehouse running two clusters for one hour would consume 128 credits (64 per cluster).
Larger warehouses don’t always equate to faster performance—especially for tasks like data loading, which are more sensitive to file count and size than compute capacity. Snowflake recommends using only as large a warehouse as needed for the workload to avoid wasting credits.
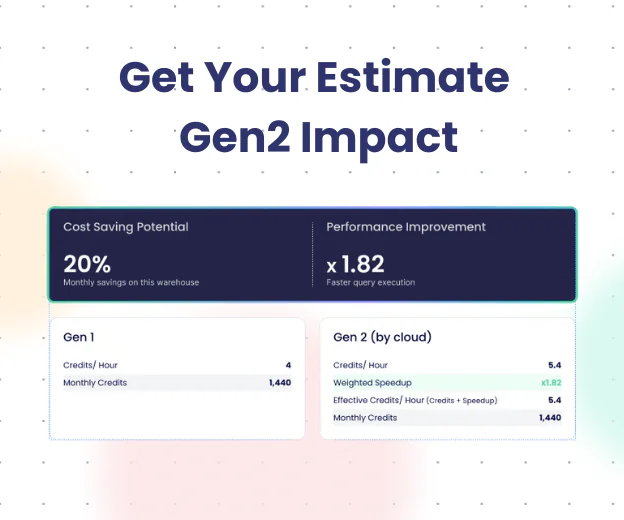
Snowflake Gen2
Gen2 warehouses are designed to improve performance across key workloads—especially those involving DML operations, large scans, and complex joins—thanks to newer hardware (e.g., AWS Graviton3) and improved parallelism. These enhancements come with a higher per-second cost: typically 1.35x higher on AWS and 1.25x higher on Azure compared to Gen1.
Despite the higher per-second cost, Gen2 can be more cost-efficient for long-running or complex workloads. Faster execution means fewer seconds billed, and better throughput reduces retries. In real-world tests, a DML-heavy operation using Gen2 cut runtime by 67% and total cost by 56%.
Gen2 is not available for the largest warehouse sizes (5X-Large or 6X-Large), so users may need to downsize when migrating. In some cases, this downsizing still results in equal or better performance due to the improved efficiency.
The key to maximizing Gen2’s cost-efficiency is workload fit. For example, one test on a query-heavy warehouse showed a 35% improvement in p95 query runtimes, but no significant change in total uptime or concurrency handling. Cost increases of up to 5% were observed on some days, highlighting the need for ongoing monitoring.
Gen2 is currently supported only in select AWS and Azure regions and is not available on GCP. Transitioning to Gen2 involves altering the warehouse’s RESOURCE_CONSTRAINT setting without changes to SQL logic.
Storage Costs
Storage costs in Snowflake are influenced by the amount of data retained in databases, including staged files, backups, and historical data maintained for recovery purposes. While Snowflake automatically compresses data, large volumes of unused or redundant data can still lead to higher expenses. Retaining obsolete datasets or failing to enforce data retention policies often results in inflated storage fees that could otherwise be mitigated.
A significant contributor to storage costs is Snowflake’s Continuous Data Protection (CDP) features, specifically Time Travel and Fail-safe.
Time Travel
Time Travel allows access to historical data for a specified retention period. The default retention period is 1 day, but it can be configured up to 90 days for Enterprise Edition accounts. Longer retention periods result in more historical data being stored, increasing storage costs. Each data change (INSERT, UPDATE, DELETE) creates additional storage due to the preservation of previous data versions. The retention period can be set at the account, database, schema, or table level using the DATA_RETENTION_TIME_IN_DAYS parameter.
Fail-safe
Fail-safe provides a non-configurable 7-day period following the Time Travel retention period, during which Snowflake can recover historical data in the event of a system failure or other catastrophic event. This data is not accessible to users and is intended solely for Snowflake’s internal recovery processes. Data in Fail-safe continues to incur storage costs until the period expires.
Table Types and Their Impact on Storage Costs
Snowflake offers different table types that affect how Time Travel and Fail-safe apply:
- Permanent Tables: Support Time Travel (up to 90 days) and have a 7-day Fail-safe period. Suitable for long-lived data requiring full recovery options.
- Transient Tables: Support Time Travel (0 or 1 day) but do not have a Fail-safe period. Ideal for data that can be regenerated and does not require long-term recovery.
- Temporary Tables: Exist only for the duration of a session and do not support Fail-safe. Best for short-lived, session-specific data.
Data Transfer Costs
Data transfer costs occur when data is moved in or out of Snowflake, or between different regions and clouds. These costs are especially relevant for cross-region replication and hybrid workloads. While transferring data is essential for operations such as disaster recovery or multi-region analytics, excessive or inefficient transfers can increase bills significantly.
Optimizing data transfer costs requires careful planning. Consider reducing unnecessary replication operations, consolidating cloud regions, or using Snowflake’s native data sharing features instead of direct transfers. Additionally, monitoring and analyzing usage patterns can help identify areas where data movement can be minimized.
Snowflake Services
Beyond compute, storage, and data transfer, Snowflake offers several managed services that can incur additional costs. These services are billed based on usage and are designed to provide additional functionality without requiring users to manage infrastructure.
Serverless Features
Snowflake provides serverless compute options for specific tasks, such as:
- Snowpipe: Automates continuous data ingestion.
- Materialized Views: Stores precomputed query results for faster access.
- Search Optimization Service: Enhances query performance on selective filters.
These services consume credits based on the compute resources used during their operation. Unlike virtual warehouses, which are user-managed, serverless features are managed by Snowflake and automatically scale based on workload demands. Costs are calculated per second of usage, with rates varying depending on the specific service.
Cloud Services Layer
The cloud services layer encompasses various functions that coordinate activities across Snowflake, including:
- Authentication and Security: Managing user access and enforcing security policies.
- Metadata Management: Handling schema definitions, query parsing, and optimization.
- Infrastructure Coordination: Orchestrating operations across compute and storage layers.
Usage of the cloud services layer incurs additional credit consumption, especially in scenarios involving:
- High-frequency metadata operations (e.g., frequent DDL statements).
- Complex query compilations.
- Frequent use of administrative commands or third-party tools that interact with metadata.
Monitoring and optimizing interactions with the cloud services layer can help manage these costs.
Snowpark Container Services
Snowpark Container Services allow users to run containerized applications and services within Snowflake’s environment. Costs associated with these services include:
- Compute Pool Costs: Based on the number and type of virtual machine nodes allocated.
- Storage Costs: For container images, logs, and any data stored within the service.
- Data Transfer Costs: For data moving in and out of the container services, including internal transfers within Snowflake.
Top Techniques for Snowflake Cost Optimization
Optimizing Compute Resources
Snowflake compute costs are a key factor in determining your overall cost when using Snowflake. Fortunately, optimizing your virtual warehouse usage by right-sizing resources and leveraging automation can reduce these costs.
1. Right-Sizing Virtual Warehouses
Many new Snowflake users default to larger virtual warehouses, but allocating more resources than necessary leads to over-provisioning, where you pay for unused power. This can drive up your Snowflake compute costs without you realizing it. To avoid this, start with a smaller warehouse and scale up as needed.
Example: Create a smaller virtual warehouse.
CREATE WAREHOUSE my_small_wh
|
2. Consolidate Warehouses
Running too many separate virtual warehouses can increase costs due to idle compute and under-utilization. Consolidating workloads onto fewer, more appropriately sized warehouses improves efficiency by maximizing resource usage and simplifying management. Identify warehouses with overlapping activity or low utilization, migrate tasks and adjust resource configurations as needed.
Example: Move reporting tasks from multiple small warehouses to a shared medium warehouse.
CREATE WAREHOUSE shared_reporting_wh
WAREHOUSE_SIZE = ‘MEDIUM’
AUTO_SUSPEND = 120
AUTO_RESUME = TRUE;
Assign tasks to use shared_reporting_wh instead of individual warehouse
ALTER TASK monthly_sales_report_task SET WAREHOUSE = shared_reporting_wh;
3. Auto-Suspend and Auto-Resume
Configuring auto-suspend to shut down warehouses when they’re not in use also helps reduce your Snowflake compute costs. You can use this alongside auto-resume, which restarts the warehouse when new queries are submitted. Together, these features ensure that you only pay for resources when needed and eliminate the need for manual intervention.
Example: Create a smaller virtual warehouse and use auto-suspend/resume to ensure you’re only paying for active time.
CREATE WAREHOUSE my_small_wh
|
Example: Modify an existing warehouse to utilize auto-suspend/resume functionality.
ALTER WAREHOUSE my_small_wh
|
4. Identifying and Sunsetting Unused Pipelines
Unused pipelines can drive up costs by consuming resources while idle. You can identify inactive pipelines by regularly reviewing Snowflake’s query history and monitoring usage logs for low or no activity over time.
Example: To find inactive pipelines or scheduled tasks, list tasks that haven’t run in the past 30 days.
SELECT name, state, last_successful_run_time
|
Before decommissioning, ensure that they’re not part of active workflows or scheduled processes by checking in with the relevant teams to confirm that they’re no longer needed. You can also temporarily deactivate them to avoid unintended disruptions and ensure that essential processes remain unaffected.
Example: Temporarily disable a task.
ALTER TASK my_etl_task SUSPEND; |
Efficient Storage Management
Poor storage management can also lead to increased costs. This section outlines best practices for optimizing data retention and using cloning features to reduce expenses.
5. Data Retention Policies
It may be tempting to keep data just in case you need it later, but this can quickly increase your expenses. Instead, define retention periods that align with your regulatory requirements and business needs. Implement policies to automatically delete or archive data after the specified period, ensuring efficient storage management.
Example: Automatically delete old rows.
DELETE FROM sales_data
|
6. Cloning and Zero-Copy Cloning
Snowflake’s cloning feature lets you create copies of databases, schemas, or tables without physically duplicating the data—this is known as zero-copy cloning. Storage is only consumed when changes are made to the cloned object.
Example: Clone a full table without using extra storage.
CREATE TABLE sales_data_clone CLONE sales_data; |
Query Performance Tuning
Snowflake query optimization directly impacts costs by reducing your cost per query. In this section, we’ll discuss two effective methods for enhancing query performance while minimizing resource consumption.
7. Utilize Result Caching
Snowflake automatically caches query results and checks the cache before recalculating a query to determine if it can use these cached results. For example, if your dashboard displays sales data, caching speeds up queries when the data hasn’t changed, saving compute resources and reducing costs over time.
Example: You can view query metadata to validate that a query used the cache.
Look for: “USED_CACHED_RESULT” = TRUE
SELECT *
|
8. Optimize Query Design
Retrieving unnecessary data damages your Snowflake query optimization. This includes selecting all rows and columns when only some are needed, or applying filters too late. These practices cause Snowflake to process more data than necessary. Avoid this by selecting only the data you need and applying ‘WHERE’ clauses early to narrow down your dataset from the start.
Bad example:
SELECT * FROM orders;
|
Better example:
SELECT order_id, order_date, total_amount
|
Monitoring and Managing User Activity
Unmonitored user activity can cause unexpected cost spikes. In this section, we’ll examine how to implement stricter access controls and monitor usage to prevent inefficient or unauthorized operations.
10. Role-Based Access Control (RBAC)
Using role-based access control (RBAC) ensures that users access only the resources necessary for their role. This prevents them from accidentally triggering resource-intensive (i.e., expensive) operations.
Example: Grant read-only access to analysts.
GRANT USAGE ON DATABASE mydb TO ROLE analyst_role;
|
11. User Activity Monitoring
Review query history and user activity regularly to detect inefficient or unauthorized operations. Snowflake’s built-in monitoring tools can help you track usage trends.
For instance, the ‘ACCOUNT_USAGE’ schema reveals usage metrics for your account, while the ‘INFORMATION_SCHEMA’ schema shows detailed information about user activity. Thus, you can track when resources were accessed and by whom.
Example: Find long-running or frequent queries that you can optimize or refactor by tracking activity with Snowflake’s metadata tables.
SELECT user_name, query_text, start_time, execution_time
|
Implementing Data Compression and Partitioning
Effective data organization lowers storage and enhances Snowflake query optimization. This section explains how Snowflake’s built-in compression and micro-partitioning optimize both storage and performance.
12. Data Compression
Snowflake automatically compresses data loaded onto its platform. This reduces the physical storage space needed for large datasets, lowering costs while maintaining accessibility.
Example: Snowflake automatically compresses data, so no action is needed. But minimizing column size and using efficient data types helps:
CREATE TABLE products
|
13. Micro-Partitioning
Snowflake automatically micro-partitions data to optimize storage and query performance. While this happens behind the scenes, you can further improve query efficiency by defining clustering keys. Clustering helps Snowflake organize micro-partitions more intelligently, making it faster to scan relevant data and skip over irrelevant blocks, especially for large, frequently queried tables.
Example: Add clustering to a large table.
ALTER TABLE sales_data
|
14. Materialized Views
Materialized views store the results of a query physically, rather than computing them on the fly. This approach improves performance for repeated queries on large datasets and reduces compute costs by avoiding redundant recalculations.
Use materialized views when queries involve expensive joins or aggregations over large, infrequently changing datasets. Keep in mind that materialized views incur storage and maintenance costs, so evaluate their usage regularly.
Example: Create a materialized view for recurring aggregate queries.
CREATE MATERIALIZED VIEW daily_sales_summary AS
SELECT store_id, DATE(order_date) AS sale_day, SUM(total_amount) AS daily_total
FROM sales_data
GROUP BY store_id, DATE(order_date);
Snowflake keeps the view up to date automatically as the base data changes. However, if your data changes frequently, consider whether the performance gains justify the extra cost of maintaining the materialized view.
Query Acceleration
Query acceleration techniques reduce execution time and improve overall system efficiency. In Snowflake, this can include using pruning, clustering, and warehouse scaling to enhance query speed without unnecessarily increasing compute costs.
15. Pruning with Filtering
Snowflake prunes partitions automatically when queries include filters on columns that align with micro-partitions. Ensure WHERE clauses target filterable columns.
Example: Query that benefits from pruning
SELECT customer_id, total_amount
FROM sales_data
WHERE transaction_date >= CURRENT_DATE – INTERVAL ‘7 days’;
16. Scale Out Concurrency with Multi-Cluster Warehouses
For high-concurrency workloads, Snowflake’s multi-cluster warehouses automatically start additional clusters to handle spikes, then shut them down when no longer needed.
Example: Create a multi-cluster warehouse
CREATE WAREHOUSE analytics_wh
WAREHOUSE_SIZE = ‘LARGE’
MAX_CLUSTER_COUNT = 3
AUTO_SUSPEND = 300
AUTO_RESUME = TRUE
SCALING_POLICY = ‘STANDARD’;
17. Use Clustering for Large Tables
Apply clustering keys to large tables when query patterns focus on a few key dimensions. This improves partition pruning and speeds up query performance.
Example: Apply clustering for better query speed
ALTER TABLE orders
CLUSTER BY (customer_id, order_date);
These techniques, used in combination, can significantly reduce both query latency and compute cost.

FAQ: Snowflake Cost Optimization
What are the biggest drivers of Snowflake costs?
Snowflake costs are primarily driven by compute (virtual warehouses and serverless services), storage (active data, Time Travel, Fail-safe), and data transfer (cross-region or cross-cloud movement).
How do virtual warehouses impact Snowflake compute costs?
Virtual warehouses consume credits per second based on size and active time. Over-sized or idle warehouses are the most common source of unnecessary spend.
Is Snowflake Gen2 more cost-effective than Gen1?
Gen2 warehouses have higher per-second rates but often reduce total cost for long-running or complex workloads due to faster execution and better throughput.
How does Time Travel affect Snowflake storage costs?
Time Travel stores historical versions of data for the retention period. Longer retention increases storage usage because each data change preserves previous versions.
When should I use transient or temporary tables?
Use transient tables for regenerable data that needs short Time Travel and no Fail-safe. Use temporary tables for session-scoped data to avoid long-term storage costs.
Do materialized views always reduce Snowflake costs?
No. Materialized views reduce compute for repeated queries but add storage and maintenance costs. They are cost-effective only for expensive, frequently reused queries.
How does query design influence Snowflake cost optimization?
Poor query design increases scanned data and execution time. Selecting only required columns, filtering early, and leveraging pruning directly reduces compute usage.
How can teams attribute Snowflake costs to users or workloads?
Query tagging enables cost attribution by labeling queries with metadata, allowing teams to analyze usage and spend by user, team, or application.